Monday 30 May 2016

Manga oorkai/ Instant oorkai

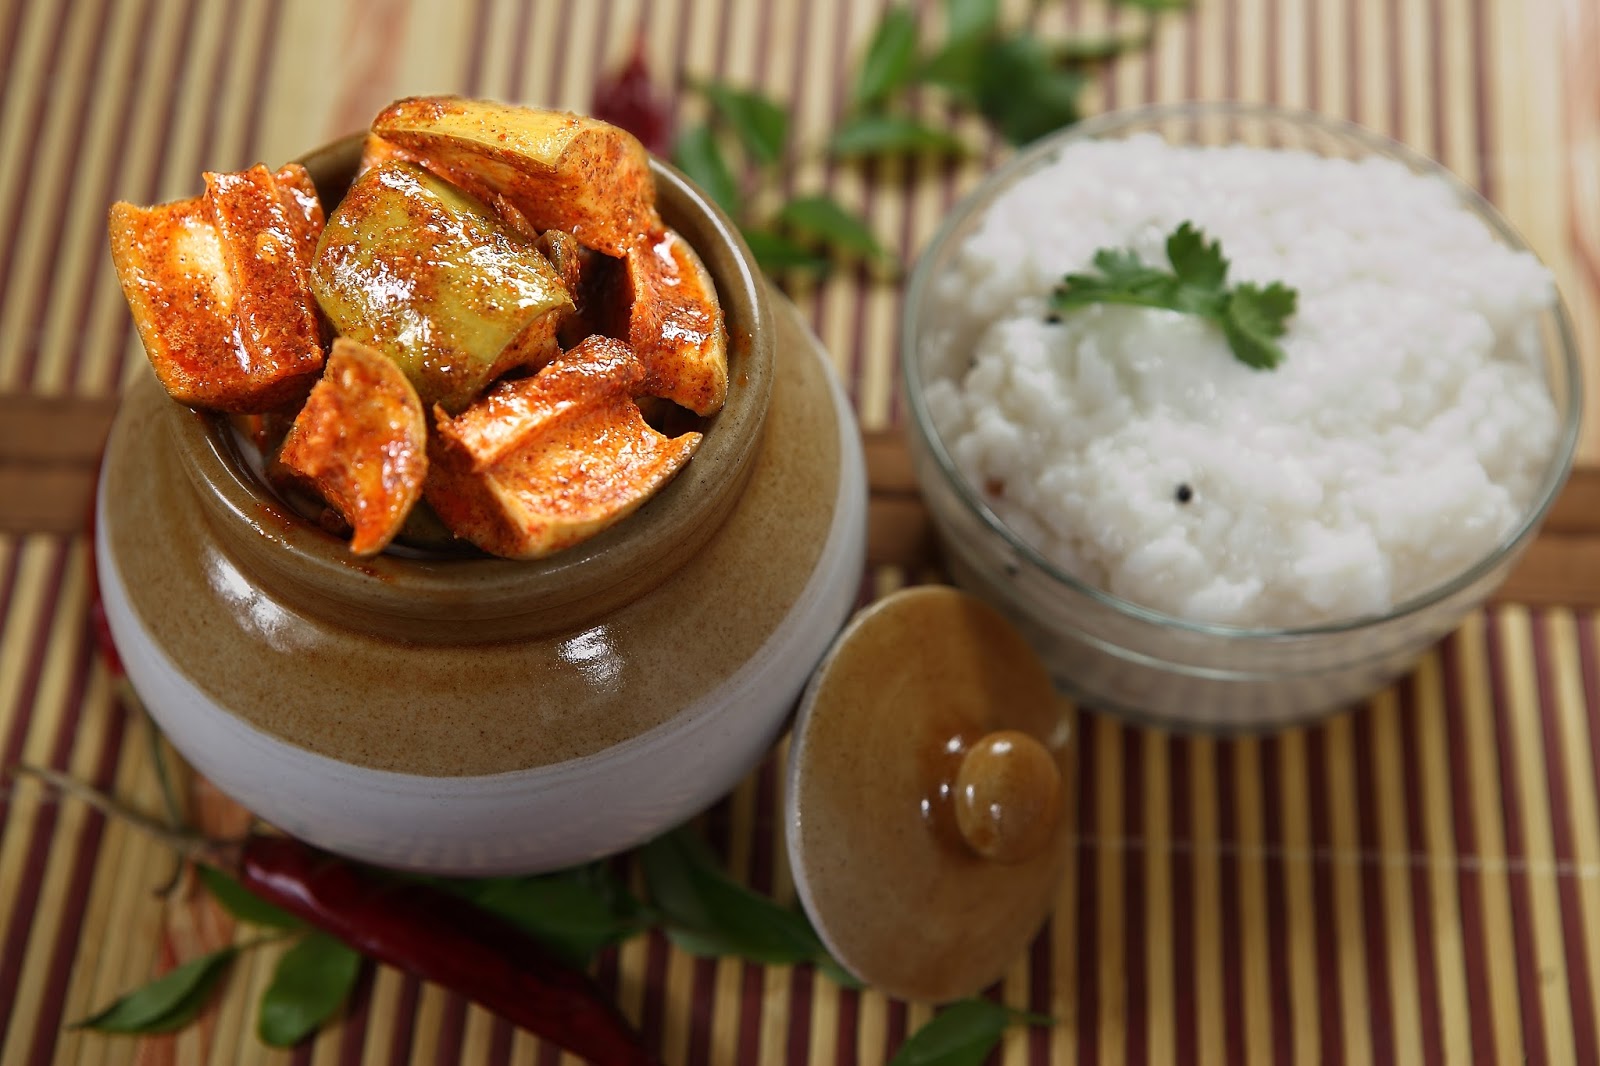
Most of my friends love my mom made instant manga oorkai. It is so simple and seasonal one. When it is prepared in right ratio, we can store it for months. I just made this recipe for Aval kitchen May month magazine. I goes well with sambar rice, curd rice. Most of the days my lunch box recipe is curd rice with instant mangai oorkai, Simple and tasty :)

Ingredients:

Kilimooku mangai - 4
Kashmiri red chilli powder - 3 tablespoon
Salt - to taste
Gingelly oil -  1/3 cup
Mustard - 1 tablespoon
Asafoetida - 2 teaspoon
Fenugreek powder - 2 tablespoon

Method:

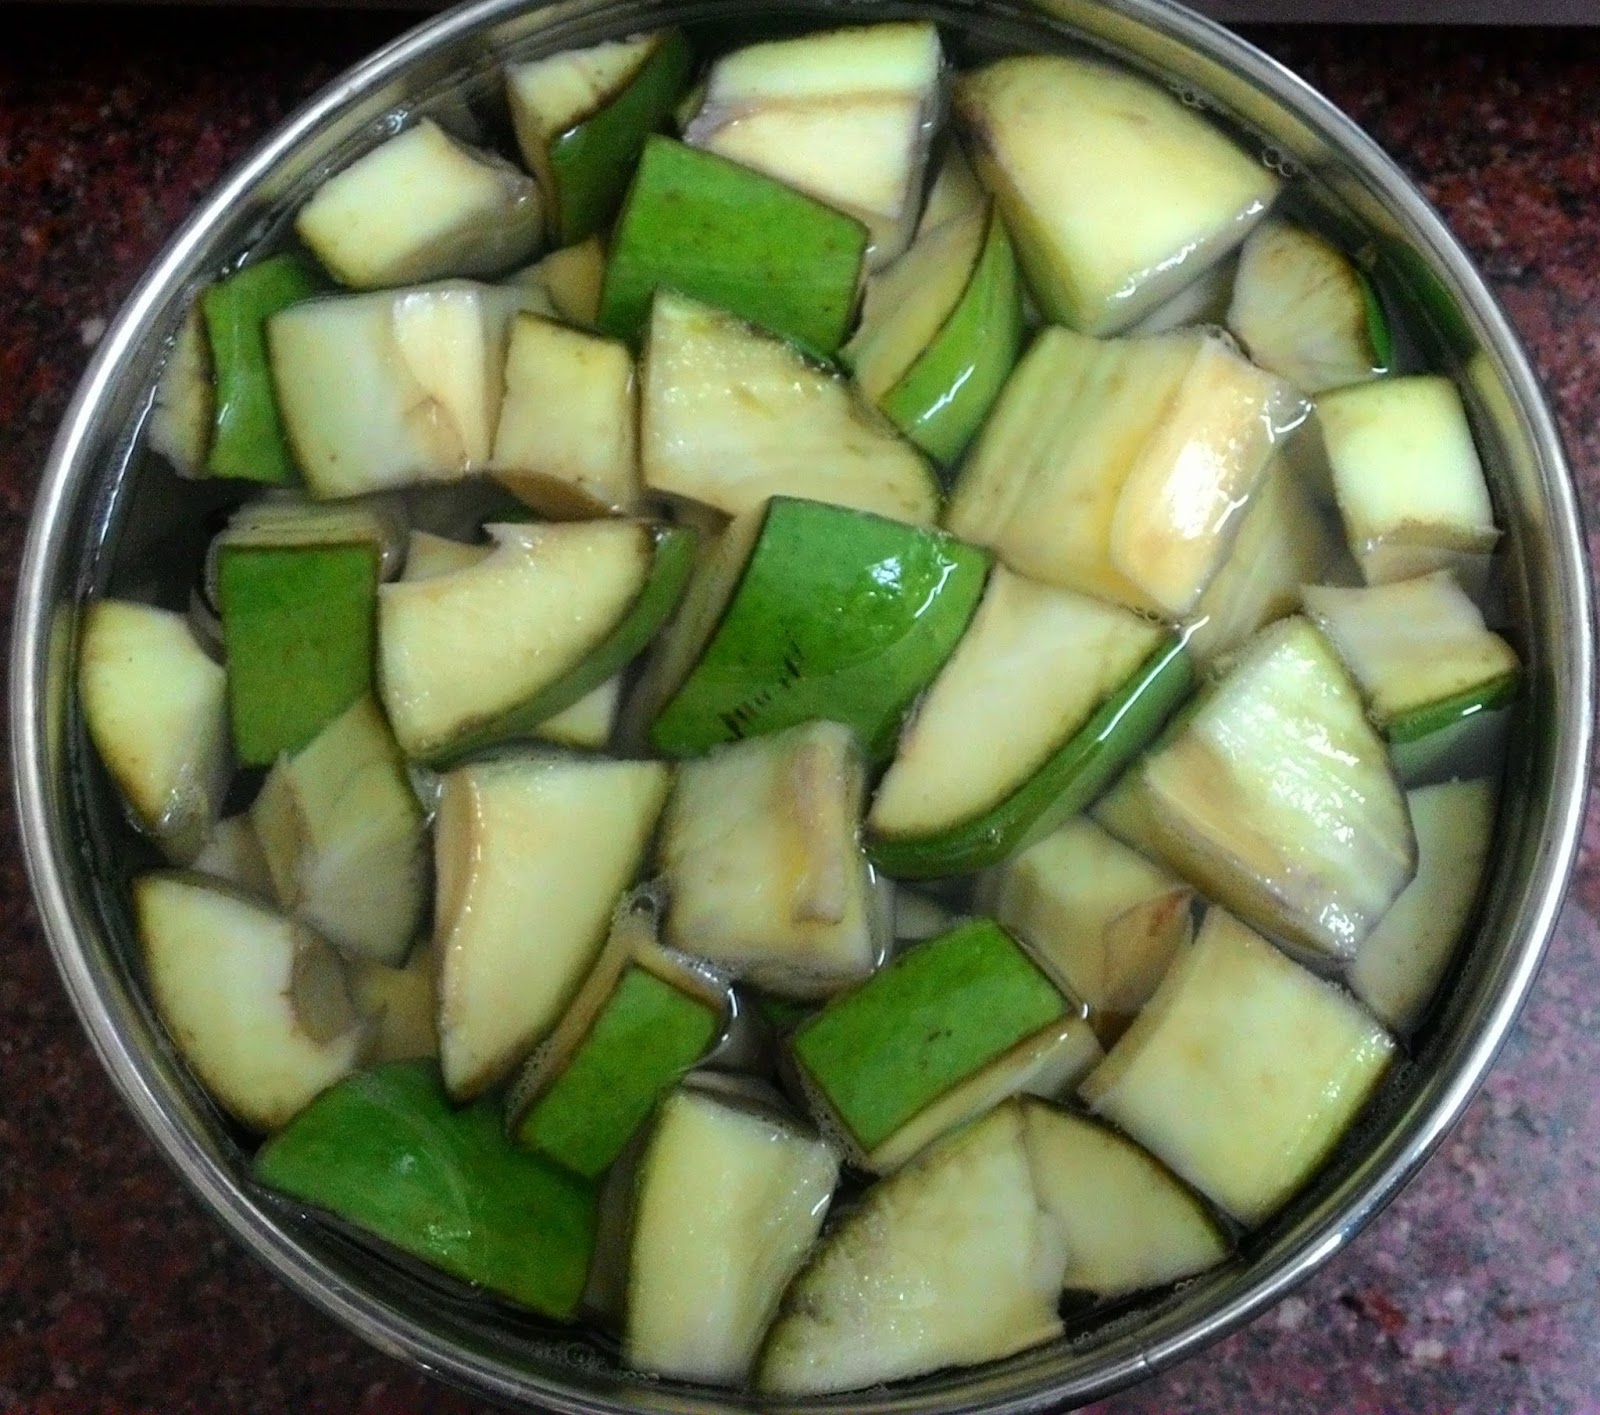
1. Choose unripe mango, wash and dry it thoroughly using kitchen towel.
2. Finely chop the mango as shown below. Make sure most of the cut pieces has green outer covering.


3. Add sufficient salt, mix and allow them to set for 2 hours in a broad bowl.
4. Dry roast fenugreek seeds and blend it in a mixer to a fine powder.
5. To the salted mango add fenugreek powder and asafoetida on the top.
6. Heat oil in a kadai and mustard, when mustard splutter, switch off the flame. To the hot oil add chilli powder mix well and immediately add the mixture to the cut mango. It gives nice aroma.


7. Mix well and store it in a airtight container.


Most yummy, tangy and spicy mango oorkai is ready.

Tips:

1. While powdering fenugreek, dry roast minimum 50 gm of fenugreek and powder it. If we powder less quantity of fenugreek it won't blend well.
2. Chilli powder should be added to the hot oil, but make sure flame is switched off before adding it. If not chilli powder will get burnt easily in oil.
3. Use only dry laddle or spoon for mixing oorkai. 

Thursday 26 May 2016

Carrot Kheer

Most favourite drink of mine and my sister from childhood days is Carrot Kheer. It is rich and heavy and full of vitamin A. I love to eat carrot as such, still i love to consume this drink when is cold. It can even be served as dessert. It has more health value when it is consumed early morning in empty stomach. It also helps in improving colour and skin complexion.

  
Ingredients:

Carrot - 1 no (large)
Milk - 2 1/2 cups
Sugar - 5 tablespoon
Cashewnuts - 5 nos
Ghee -1 teaspoon
Water - 1 cup

Method:

1. Dice carrot into big peices and slightly toss it in pressure pan by adding a teaspoon of ghee.
2. Add water to the tossed carrot and pressure cook it for 5 whistle.


3. After removing pressure allow them to cool off.
4. In a blender add boiled carrots and blend it into semi paste and then add cold milk and blend well.
5. Finally add sugar and blend into fine juice.

Serve this kheer by adding finely chopped cashewnuts. Rich, heavy and healthy carrot kheer is rady to be served.

Tips:

1. Don't blend carrot and milk when it is hot.
2. If this kheer is served as dessert, then add elachi powder while blending and add fried cashewnuts at last and little saffron too to enrich the taste.

Wednesday 25 May 2016

Beetroot Halwa (Simple Microwave Recipe)

Beetroot halwa is one of my favorite halwa recipe. My mom used to make it very often when I was doing my school. It taste so yummy and colour is much attractive. Naturally beetroot contains high content of sucrose and it gets sticky soon. It is difficult to mix evenly throughout the process. In Microwave we can make this dish without straining much. It is very simple to make with less ingredients.
Preparation time: 10 mins
Cooking time: 60 mins
Serves: 4 no 

Ingredients:
Beetroot - 2 cups (grated)
Sugar- 1 cup
Elachi powder - 2 teaspoon
Milk - 2 cups
Cashewnuts - 10 nos
Ghee - 5 teaspoon
Almonds - 5 nos

Method: 
1. Peel off the beetroot skin and grate it to fine pieces.
2. In a large microwave safe bowl, mix beetroot and 3 teaspoon of ghee. Set microwave in high and cook for 5 mins.


3. Add milk and mix well and then microwave it again for 30 mins, stirring in between once in 10 mins. (Its to remove the rawness of beetroot).


4. Now add sugar, elachi powder and microwave it in high  for 20 mins, stirring once in every 10 mins.
5. In a separate pan, fry cashew nuts till golden brown colour and add this to halwa and microwave it for another10 mins.
6. Garnish with Almonds and serve it hot.

Yummy, attractive, hot Indian dessert is ready to be served.

Tips:

1. If you need halwa to be little crispy, 5th step can be carried over in microwave+grill mode for 10 mins.

Tuesday 24 May 2016

Gobi Manchurian Gravy

The best combination I love to have with Vegetable fried rice is Gobi Manchurian. It is a most famous Indo-Chinese gravy variety. Dry version of it can be served as starter.  When ever I go to restaurants I usually have this as a starter or as a gravy.

Preparation Time: 20 mins
Cooking Time: 20 mins
Serves: 2 nos

Ingredients:

Cauliflower florets - 1 cup (small cauliflower)
Ginger garlic paste - 1 teaspoon
Chilli powder - 2 teaspoon
All purpose flour/ Maida - 1/2 cup
Corn flour - 1/4 cup
Rice flour -1 tablespoon
Salt - to taste

For the sauce

Onion -1 (finely chopped)
Capsicum - 1/2 (finely chopped)
Red chilli sauce - 2 teaspoon
Oil - 2 tablespoon
Garlic - 20 nos (finely chopped)
Green chilli -1 (diagonally chopped)
Spring onion green - 3 tablespoon
Tomato Sauce - 3 tablespoon
Soya sauce - 1 tablespoon
Sugar - 1/2 teaspoon

For the Gravy:

Corn flour - 1 tablespoon
Water - 1 cup

Method:

1. Cut cauliflower into small florets and add it to boiling salt water for 5 minutes. Drain the water and wash the florets in running cold water and completely drain it.
2. Mix maida, cornflour, rice flour, salt, chilli powder, ginger garlic paste with little water to make a thick batter. The batter should coat the cauliflower, so it should not be too thin.


3. Dip the Gobi florets in the batter completely and deep fry them until outer layer is cooked. Allow the florets to cool  off. Deep fry them again until it turns golden brown colour. This process helps in sustaining the crispness of florets.


4. Heat oil in a kadai and fry garlic, followed by chilli, onion, capsicum in high heat. Add spring onions green, chilli sauce, tomato sauce, soya sauce, sugar and needed salt.


5. Add fried gobi to it and toss well. This is dry version of manchurian.
6. To make gravy, mix 1 tablespoon of cornflour in 1 cup of water without lumps, add this to the above and cook till gravy consistency is achieved. Garnish with spring onions.


Tips:

1. To increase the taste of gravy sugar is added.
2. Adding cornflour will thicken the gravy much and gravy will become thick once cool off. So make sure to cook until semi gravy consistency.

Saturday 21 May 2016

Vegetable Fried Rice

The most favourite food of mine is Veg Fried Rice with Gobi Manchurian gravy. I still remember my father usually get it for me every week or atleast twice a week from hotel when I was in college. When ever I feel bored, we usually go for a long walk in kilometers and will have Fried rice and will come back again walking. It will be more peaceful to go on such a walk with most loving father. I first tried making fried rice after marriage which really came out well. It is easy to make and taste and look lies in veggies how fine its been chopped.

Preparation time: 20 mins
Cooking time: 25 mins 
Serves - 2nos

Ingredients:

Basmathi rice -1 cup(200 gm)
Garlic cloves- 25 nos (finely chopped)
Beans - 100 gm (finely chopped)
Carrot - 1no (finely chopped)
Cabbage -1 cup (shredded )
Capsicum - 1/2 (finely chopped)
Spring onion - 1 tablespoon (finely chopped)
Soya sauce - 1 teaspoon
Red chilli sauce - 1 teaspoon
Vinegar - 1 teaspoon
Pepper powder - to taste (2 teaspoon)
Salt - to taste
Sugar -1/2 teaspoon
Oil - 3 tablespoon
Water - 6 cup

Method:

To Cook Rice:

1. Soak basmathi rice for 30 mins and wash well to remove starch from it.
2. Boil water in a open pressure pan/pot by adding 1 teaspoon of oil and little salt. Add soaked and drained basmathi rice to the hot water.
3. In a low flame gently cook rice without lid.


4. When rice is cooked, drain rice and allow to cool down and gets separated.


To make Fried Rice:

1. Heat 3 tablespoon of oil in a wok/ large kadai and add finely chopped garlic. Saute it for a minute and add beans. Cook until beans turns little crispy, add carrot, capsicum and cabbage one by one and saute well.


2.In a high flame continuously toss and stir while frying so that the veggies are uniformly cooked and do not get burnt.
3. Veggies have to be stir fried, till they are almost cooked and yet retain their crunchiness and crispiness.


4. Add soya sauce, chilli sauce, vinegar, salt, sugar to the veggies and saute well for 2 minute.


5. Immediately add rice and toss well. Add pepper powder and stir fry for a few minutes till the sauce has coated the fried rice well. Keep a check when adding salt, as soy sauce already has salt in it.


6. Before switching off flame add spring onion and toss a minute.

Yummy, hot Fried rice is ready to be served. Serve it hot with Indochinese gravy (Gobi Manchurian, Vegetable ball Manchurian).

Tips:

1. Don't saute garlic until it turns brown, just saute it until nice aroma arises.
2. Beans usually take large time to get cook in oil, so add it 1st and saute well until it turns crispy. Then add rest of the veggies.

Thursday 19 May 2016

Parupu payasam/ Paasi parupu payasam

Paasi parupu payasam is my favourite one. I still remember the day when I first cooked this payasam for my father when my mom was at Hyderabad. He just loved it. I love to eat any payasam when it is mixed with jaggery. For any authentic occasion this will be my fatafat payasam. It usually takes max of 20 mins to prepare this. I usually add ghee fried finely chopped coconut pieces to this payasam, which enhances taste of it.

Preparation time : 5 mins
Cooking time : 20 mins
Serves - 4

Ingredients:

Paasiparupu/Moong dal - 1/2 cup
Jaggery - 3/4 cup grated
Coconut pieces - 1/4 cup (Optional)
Water -2 cup
Warm Milk - 1/2 cup
Cashewnuts - 10 nos
Dry grapes - 10 nos
Elachi powder - 1 teaspoon
Ghee - 3 tablespoon

Method:

1. Dry roast moong dal in a pressure pan in slow flame until nice aroma arises. Add 2 cups of water to the fried dal and pressure cook for 4-5 whistle.


2. In a heavy bottom pan, add jaggery and little water and allow to boil. Once jaggery disolves, filter it to remove impurities. Now add elachi powder to filtered jaggery liquid and allow to boil.
3. Smash moong dal and add it to jaggery and mix well such that no lumps are formed.


4. Heat ghee in small kadai and fry coconut pieces, cashewnuts and dry grapes to golden colour.


5. Finally add warm milk to payasam and cook well for 5 mins.
6. Serve payasam by adding ghee fried cashewnuts, dry grapes and coconut pieces.

Yummy, tasty and mouthwatering paasi parupu payasam is ready :)

Tuesday 17 May 2016

Andhra Aavakai/ Aavakai pickle

I love Mango pickle that too when it is prepared by Andhra friends, its special yup quite hot and spicy. During my college I have many telgu friends, they used to prepare this pickle in 25 kg bucket for a year per family. I wonder how much they will consume :) every year. In markets there are so many shops which sells only Aavakai mango. Its quite difficult to get cut at home, I used to get it cut at place where I used to usually buy this Aavakai mango. Every piece of mango will have kernel attached (outer core of seed), uniformly cut.

In Andhra, if we visit any home for lunch we will be served with this pickle along with ghee, hot rice, pappu and papad. It's so traditional there.

Ingredients:

Raw green mango - 6, each cut into 6-8 pieces with kernel
Mustard seed powder - 1 cup (dry roasted and powdered)
Rock Salt - 1 cup ( finely powdered)
Kasmiri Red chilli powder - 1 cup
Fenugreek seeds - 1 tablespoon
Garlic cloves - 8-10 nos
Gingelly oil - 11/4 cup

Method:

1. Wash and soak cut mangoes in water for half an hour to remove mud and dust over it. Wash the pickle jars and sun dry the jar till completely dry with absolutely no moisture.


2. Wipe the mangoes with cloth and remove ripen pieces or the one which doesn't have green covering.
3. Spread the wiped mango over a dry cloth and allow them to dry for 4 hours.


4. Heat a kadai and dryroast the mustard seeds. Allow them to cool off and blend it in a mixer to a fine powder.
5. In a wide vessel, add powdered rocksalt, mustard powder and chilli powder of equal amount and mix well using dry hand. Add fenugreek seeds, fresh garlic cloves and 3/4 cup of gingelly oil to it and mix well, such that when you take a fistful of mixture and close your fist, it should be able to take a shape.


6. Add the mango pieces and mix well with your hands such that the mixture coats the mango pieces. Add these spice coated mango pieces to the jar. Repeat the same process for all mango and add remaining spice mixture finally to the jar. Pour 1/4 cup of oil on the top and cover the jar / tie a cloth over the lid and keep in dry area.


7. On 3 or 4th day, open the pickle jar and mix the pickle with clean and dry ladle.
8. If needed add 1/4 cup of oil to it, such that pickle is covered with a thin layer of oil on its top. Repeat step 7 for next 4 days. On 8th day pickle will be ready to consume.
8. Remove a small quantity of pickle from big jar to a small airtight container for daily use.

Serve this pickle with curd rice or hot steamed rice and pappu.

Friday 13 May 2016

Grape Pickle

I love grapes and used to have one whole bowl for lunch when I was in London. Usually I used to make Jam out of fruits but tried pickle this time out of grapes. It came out so good.Grape pickle will contain mixed of all the following taste little sour, tangy, sweet, spicy. Its quite easy to make and no much ingredients are really required. One can store this pickle for a month and can have along with curd rice, dosa and chapathi.


Ingredients:

Black seedless grapes - 750gm
Green chilli - 3 nos (finely chopped)
Garlic - 5 nos (finely chopped)
Ginger - 2 nos (1 inch length, finely chopped)
Sesame oil -4 tablespoon
Red chilli powder - 1 teaspoon
Salt - to taste
Mustard seeds -1 teaspoon
Fenugreek seeds - 1 teaspoon
Curry leaves (dried) - 1 teaspoon

Method:

1. In a kadai dryroast mustard seeds, fenugreek seeds and curry leaves. Blend it in a mixer to fine powder once it cool off.


2. Heat one tablespoon oil and fry garlic, ginger and chilli. Once it is cooked, keep it in a bowl seperately.


3. Wash and remove grapes from its stem and cut each grape into 2 half lengthwise.


4. To the same pan, add 3 tablespoon oil and add the chopped grapes. Cook well until 70% of grape juice evaporates and oil ooze out from its corner. Mix fried garlic, chilli and ginger.


5. Add salt, chilli powder and roasted powder. Slow cook it for 10 mins.


Fantastic and glassy texture grape pickle is ready to be served.

Wednesday 11 May 2016

Potato Sandwidch (Fatafat)

My hubby is potato lover. Baked potato in any form he loves it too much. Generally he will eat baked potato mixed with herbs and cheese. Frequently I used to make this fatafat sandwidch which takes only 5 mins to prepare if all ingredients are ready. This is a fantastic, filling evening snack for kids. It could even been send as a snack box recipe to school.


Ingredients:

Boiled potato - 2 nos
Bread slices - 6 nos
Butter - 2 tablespoon
Green chilli - 1 no (finely chopped)
Coriander - 2 tablespoon (finely chopped)
Turmeric Powder - 1/4 teaspoon
Chilli powder - 1/2 teaspoon
Cumin powder - 1/2 teaspoon
Garam masala - 1/2 teaspoon
Salt- to taste

Method:

1. Boil potato for 5 whistle in pressure cooker. Peel of the skin and mash well. Make sure no lumps are left.
2. Add chilli, coriander, turmeric powder, chilli powder, cumin powder, garam masala and salt to the mashed potato and mix well.
3. Butter one side of the bread and spread the potato masala evenly on other side.
4. Heat a tawa and toast the butter side bread first until it turns golden brown.Flip it over, add little butter and cook the potato in medium flame, until potato masala get roasted.

Serve the tasty Sandwidch hot with Tea/ coffee. 

Wednesday 4 May 2016

Brinjal rice/ Kathirikkai sadham/ Vangi bath

One of the most easiest variety rice which could be prepared in 20 mins of time quite healthy than other variety rice is Vangi bath/ kathirikkai sadham. My hubby is fond of brinjal,so often I used to make this rice. General I use light purple brinjal which doesn't have bitter taste. My mom used to make this rice for me during college days. I love to have it vadam / mango pickle usually.

 Preparation time: 15 mins
Cooking time : 15 mins
Serves - 2 nos

Ingredients:

Raw rice - 1 cup
Water - 3 cup
Brinjal - 7 nos
Onion - 1 (large, thinly sliced)
Green chilli - 1 (large, diagonally chopped)
Ginger - 1 teaspoon (grated, optional)
Curry leaves - few nos
Turmeric powder - 1/2 teaspoon
Urad dal - 1 teaspoon
Channa dal - 11/2 teaspoon
Cashewnuts - 10 nos
Oil - 3 tablespoon
Salt - to taste

For roast and grind:

Channa dal - 1 tablespoon
Urad dal - 1 teaspoon
Red chilli - 3 nos
Coconut grated - 2 tablespoon
Sesame seeds - 1 teaspoon
Pepper corns - 7 nos

 Method:
nut, grated - 2 tblsp

channa dal - 1 tblsp

Urad dal - 1 tsp

Coriander seeds - 1 tsp

pepper corns - 7

Red chilli - 3 - See more at: http://www.rakskitchen.net/2008/11/vangi-bath-brinjal-rice-for-rice-mela.html#sthash.ggkhxWqt.dpuf
Coconut, grated - 2 tblsp

channa dal - 1 tblsp

Urad dal - 1 tsp

Coriander seeds - 1 tsp

pepper corns - 7

Red chilli - 3 - See more at: http://www.rakskitchen.net/2008/11/vangi-bath-brinjal-rice-for-rice-mela.html#sthash.ggkhxWqt.dpuf

1.  Boil raw rice in pressure cooker. Rice and water would be in the ratio 1:3. Add little oil and salt, so that rice will not get stick together.
2. Spread steamed rice in a plate or large vessel to cool off.
3. Heat little oil in a kadai and roast all ingredients given in the roast and grind except coconut until its aroma raises. Finally add coconut and saute well. Allow them to cool off and grind this in a blender to fine powder.  Now Vangi bath masala is ready. 
 
4. Heat oil in a kadai, add mustard to it. Once mustard seeds splutter, add urad dal, channa dal, curry leaves, cashewnuts followed by green chilli and onion. Saute well until onion turns translucent colour.

 
5. Add sliced brinjal to kadai and saute well until brinjal is cooked to 50%. Add turmeric powder, salt, vangi masala and mix well. In slow flame, allow brinjal to cook well.


6.Finally add cooked rice to the kadai and mix well by adding little oil. Switch off flame.

Simple but exotic brinjal rice is ready. Serve it with vadam or mangoes.

Tips:

1. Vangi masala can be prepared in whole large quantity and store it in a bottle. It can even be refrigerated.
2. If brinjal rice need to be spicy add one more chopped chilli and increase the ratio of pepper to 10 in vangai masala.
3. After adding  masala to brinjal, cook the brinjal only in low flame until masala raw smell vanish off.

Coconut, grated - 2 tblsp

channa dal - 1 tblsp

Urad dal - 1 tsp

Coriander seeds - 1 tsp

pepper corns - 7

Red chilli - 3 - See more at: http://www.rakskitchen.net/2008/11/vangi-bath-brinjal-rice-for-rice-mela.html#sthash.ggkhxWqt.dpuf
Coconut, grated - 2 tblsp

channa dal - 1 tblsp

Urad dal - 1 tsp

Coriander seeds - 1 tsp

pepper corns - 7

Red chilli - 3 - See more at: http://www.rakskitchen.net/2008/11/vangi-bath-brinjal-rice-for-rice-mela.html#sthash.ggkhxWqt.dpuf